Royal Icing: Test for Royal Icing Consistency by Using Tiny Piping Cones
If you are following the steps in my Royal Icing tutorial series, this article relates to some of the items I listed in “Royal Icing: Assemble Supplies.”
Because you only need a few tablespoons of Royal Icing at a time to test its consistency, use small piping cones (“bags”). Unfortunately, there are no ready-made tiny cones available to buy. Fortunately, making your own small cones is fairly easy.
Making and Using Very Small Piping Cones
The least expensive hand-made piping cones are made out of parchment paper. Follow any of the tutorials below to learn how to construct one:
{:} Google search on “How to Make Parchment Piping Cones.”
{:} Video of Julia Usher on “How to Make Parchment Piping Cones.”
{:} Print article by Julia Usher on “How to Make Parchment Piping Cones.”
{:} How to Make a Mini Piping Bag
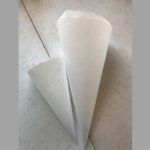
After learning how to make a standard sized cone, simply reduce the size of your triangle. I use pre-made parchment triangles which you can find on Amizon by searching on the phrase, “Parchment Triangles for Baking.” Cut the standard triangle in half, fold, and secure the long edge with tape.
Use office binder clips to secure the top after the mini-cone is filled with icing, or tape it. Because the cone can be so small, it may be better to firmly secure the top than to roll it over like you would with a bigger cone to avoid frosting spurting out.
Note that you can also attach a metal piping tip to a paper cone, but to make a tight seal, you must tape the tip to the paper, which is not very efficient.

You can also make small bags out of standard disposable plastic pastry bags simply by cutting them down to size. The advantage to using a disposable plastic pastry bag is you can easily attach a tip to it via a coupler. Seal the top of the small bag with a snack bag clip.
If you don’t use a piping tip, clip the tip of the bag to make a small hole.

Another way to create a tiny cone is by using a sandwich or half-quart plastic bag. Remove the top seal, then cut the remaining portion in half, bottom to top. Fill a remaining section with icing, seal with a snack bag or binder clip, snip the tip, and squeeze. Be careful that you do not squeeze so strongly that the icing comes out of the top!

The cookies below were decorated at a cookie frosting party with tiny parchment piping bags. You might find that tiny piping bags work better than big ones when you want to make a lot of designs from a wide assortment of colors. They are commonly used, in fact, for very delicate work.

Article Series
For Royal Icing recipes, CLICK HERE
For a list of all articles in this series, CLICK HERE
Questions? Comments? Additions? Corrections? Write to Karen Little at karen@Littleviews.com
Written for Littleviews-Crafts.com by Karen Little, publisher. All rights reserved, but feel free to re-publish this article after contacting Karen so she knows where to find it.