Tag: Royal Icing Tutorials
Royal Icing Recipes (update 8/9/19)
Royal Icing primarily consists of egg whites whipped with powdered sugar, plus a little flavoring,. Unfortunately, recipe directions very greatly as do ingredients which can include raw egg whites, pasteurized egg whites, or dry, meringue powder.
I began making Royal Icing in late 2017 and was disappointed with the results. By mid-2018, I began testing a number of recipes and believe that the one I reproduced here is foolproof.
This recipe contains pasteurized egg whites, fine (10x) powdered sugar, and a touch of flavoring. It dries to a smooth surface, does not bubble under the surface as it dries, does not pit at piping junctures, is easy to flow, and is not dull.
Recipe for a Very Firm Royal Icing
Ingredients:
2 pounds of fine (**10x) powdered sugar or 8 rounded cups of powdered sugar
11 tablespoons (5.5 ounces) of pasteurized egg whites (you’ll find this product where eggs are sold)
2 “slight” teaspoons of flavoring, to taste
Instructions:
There is no order for mixing the ingredients. Simply put them all into a bowl at the same time, then turn your heavy-duty mixer on, using an easy-to-clean paddle beater.
Detail: Start on a low speed so that dry ingredients don’t fly about. Increase the speed to high until everything is pure white. Scrape so there is no loose powdered sugar left on the sides or bottom of your bowl.
There is no exact recipe for making Royal Icing, however, if you prefer to be exacting, measure ingredients by weight.
There is a wide margin for success no matter how much powdered sugar you add with the consistency you need being dictated by the decorating task at hand. This ranges from flow (more liquid) to a very very stiff consistency required for piping shapes, like flowers (more powdered sugar).
Below is a “rounded cup” of powdered sugar you can use for the initial batch.

Objectives:
The consistency (thickness) of the resulting icing depends on humidity in your environment, which adds moisture to your mixture, and the amount of moisture supplied by the egg whites.
The firmer the initial batch of Royal Icing, the better, as the icing can be thinned for a variety of your needs without adding more powdered sugar.
An extremely stiff consistency is used for making structures, like Royal Icing flowers. For more examples than the picture below, check out those made by the Barefoot Baker’s tutorial.

To identify a stiff consistency, stir the batch with a beater or spoon. When you lift the beater up, peaks form that do not bend or change shape. If the frosting flattens or blends even a little bit, it is not truly “stiff.”

A very thick consistency, however, displays a very minor amount of blending and is good for most tasks as it can also be thinned.
To identify a very thick consistency, stir the batch with a beater or spoon. When you lift the beater up, icing peaks form that very, very slowly bend over and eventually sink into a flat surface.
Adjustments are made to portions of the initial batch as your needs dictate.
To increase the stiffness of a portion, add more powdered sugar, a little at a time.
To decrease (moisten) the stiffness of a portion, add water, a little at a time. I recommend you use a glass, food-grade spray bottle to add small amounts of water and not measuring spoons.
Light Corn Syrup:
The addition of light corn syrup to a portion produces a more pliable, elastic mixture that dries to a sheen, like in the photo that follows:

Batches without light corn syrup tend to have a dull surface, like the cookie below:

Light corn syrup is a liquid, so adding it to a portion has almost the same effect as adding water. Blogs by famed pastry implement manufacturer, Wilton, for example, suggest using light corn syrup instead of water to thin Royal Icing. Measurement is a matter of observation based on your consistency needs.
Whether water or a combination of water and light corn syrup, be careful to add it in small amounts because to repair a batch, sometimes a significant amount of additional powdered sugar is required.
I currently use light corn syrup almost exclusively, followed as needed by only a “touch” of water. Corn syrup can be added to an extremely stiff consistency to give the results a sheen, but you run the risk of making your batch too soft to hold shapes.
Eyeball Measurement:
The most foolproof recipe for Royal Icing is the one posted here. When working with it, however, it is up to you to observe its behavior based on your needs.
Flow consistency should not be so moist that it overflows borders or cookie edges.
Piping consistency should not be so dry that you can’t get it through your piping tip, or when you can get it through your tip, not so dry that the extrusion breaks, bunches up, rides up the side of your piping tip, or hurts your hand from squeezing the piping bag.
Extremely stiff or flower development consistency must be dry enough to hold piped shapes, yet moist enough to go through your piping tip. Experiment by adding small amounts of additional powdered sugar until the shapes you pipe hold their own.
Sifting Powdered Sugar:
I have not found it necessary to sift 10X powdered sugar for the recipe I recommend. Even dried bits of powdered sugar will re-moisturize when stirred back into a batch.
I do not use very fine tips. PME #00, or #0, for example, can get clogged. Clogging most commonly occurs during piping, when you set your piping bag aside and the icing in the tip begins to dry out. Work very quickly with small tips to avoid this problem and consider using a smaller amount in your piping bag, which you’ll frequently change, rather than a lot like you would during a flooding operation where icing must cover broad areas.
If you are worried about lumps in your icing, put the icing through a fine metal strainer before filling a bag.
Storage:
Store the icing in an air-tight container. Consider placing plastic wrap over the icing before snapping the top on the container. It can be kept for days in a refrigerator, although the mixture must be vigorously stirred before reuse.
Mixing
The initial batch of Royal Icing is quite thick and demands a heavy-duty mixer. If you are on a budget, the 300 watt, Hamilton Beach 63325 6-Speed Stand Mixer for under $100 is a good buy.
Drying and storing Royal Icing
- Freshly decorated cookies taste best, with my preference being within three days of being iced. Icing on stored decorated cookies becomes harder and more crispy as they age.
- While crispy icing is pretty, pay attention to the quality of your cookie. Cookies exposed to high humidity become limp, with some softness appearing under the icing.
- Royal Icing can be stored in the refrigerator for several days. Place a plastic covering directly on the icing, then seal the container over that covering with an air-tight lid.
- After applying icing to cookies, the best practice calls for drying the icing under a fan. If the icing dents when pressed, it is not completely dry.
- To keep cookies crisp, store iced cookies in an air tight container with parchment paper between them or in individual, air-tight bags.
- Check to make sure there is no condensation in your container or bag when storing iced cookies in the refrigerator.
- If possible, work in an air conditioned environment. Avoid making Royal Icing or frosting cookies with it when the humidity in your environment is high or not controlled. Check your atmosphere on a digital humidity monitor. Even heated rooms can suffer from high humidity, especially a kitchen.
- Under normal to low humidity days, iced cookies can be left out for a few days, during which period the icing becomes harder. On high humidity days, if the cookies are left out, you will lose the cookies’ crispness and possibly destroy your work.
Links
- Pictorial article by SemiSweet (Mike Tamplin), SemiSweetDesigns.com
- Cookie design master, Julia Usher, www.juliausher.com
- Blueprint, formerly Craftsy, has several excellent fee-based courses on the use of Royal Icing on cookies. I learned from
Better Basics for Exceptional Cookies by Stephanie Kappel. Also excellent are courses by Amber Spiegel. Many of the tutorial instructors here also have websites and YouTube videos.
-
Royal Icing with Consistency Adjustments, blog by Julia Usher, www.juliausher.com
-
Toolbox Talk: Corn Syrup in Royal Icing, research article by member LIESBET on “Toolbox Talk,” a site by Julia Usher, www.juliausher.com
-
Make good use of Google and YouTube searches to find numerous articles and tutorials developed by people excited about skill sharing. Royal Icing Tutorials
- How to make a simple Royal Icing primrose, a tutorial by The Barefoot Baker, thebearfootbaker.com.
Article series
To see a list of all articles in this series, CLICK HERE
**Note: 10X refers to a finely milled powder sugar with cornstarch is added to prevent caking.
Questions? Comments? Additions? Corrections? Write to Karen Little at karen@Littleviews.com
Written for Littleviews-Crafts.com by Karen Little, publisher. All rights reserved, but feel free to re-publish this article after contacting Karen so she knows where to find it.
How to Test Royal Icing for Consistency (updated July 15, 2019)

Consistency describes the behavior of Royal Icing required to achieve your objectives. The right consistency is based upon:
<+> Recipe: The behavior and outcome of recipes differs with ingredients and humidity. I personally recommend recipes that contain real egg whites, preferring pasteurized egg whites. (See “Royal Icing Recipes“)
<+> Flatness: Refers to the time it takes for the surface of Royal Icing to flatten, usually indicating how much moisture (water) was added to the mixture. If too much time elapses during the settling process, the surface of the icing begins to harden, interfering with smoothness.
<+> Piping Tips: The ease of extrusion from a very small tip and a large one is different. Icing consistency is often different for different sized tips, with a looser consistency possibly needed for very small tips than for larger sizes.
<+> Humidity: The higher the humidity, the looser the mixture as the icing absorbs atmospheric water.
Examples of Royal Icing Art
When you plan your icing project, be aware that every distinct section of a Royal Icing decorated cookie requires a unique batch of Royal Icing. Each unique batch is defined by consistency (use), its color and possibly the tip sized used to pipe it, with all batches being subsets of the initial batch. A single cookie design, like the green hearts below, might require multiple batches.
Note: Examples from Pinterest

The three examples below demonstrate three different Royal Icing consistencies:
- A flood consistency was used on the white and pink cookie, which dried to a firm, smooth surface.
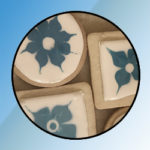
- A “wet on wet” consistency was used on the white and purple cookie, with the purple sinking into the white icing which resulted in a smooth surface.
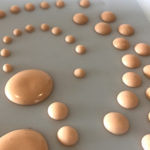
- A “dot” consistency was used on the last cookie. This consistency results in dome-topped dots. If peaks appear, the consistency is not correct. Add a tiny amount of water to your mix.

If you do not test all of your design’s batches for consistency prior to using them, sections of your design might fail, rendering overall disappointing results.

Consistency Testing Benchmarks
It would be nice to think that “one consistency size fits all,” but it doesn’t. Even seasoned experts test for the presence of the proper consistencies before beginning their design process. Here is what to look for:
- Flood: This is used to fill large areas. Rather than paying attention to the time it takes to reach flatness, I recommend you test it on a copy of your cookie area or design. If it works as planned, you nailed it. If not, adjust until it does.
- Slightly stiff: This is used to pipe dots or pearls. Again, test to determine whether your dots form domes instead of peaks. If they do, proceed to place dots on your cookies. If not, adjust until they settle properly.
- Flexible: This allows you to easily pipe lines and borders that closely (but not necessarily exactly) retain their extrusion shape.
- Stiff to Extremely Stiff: This consistency does not spread and is used to create flowers, decorative borders, and other shapes. Strangely, this is a difficult consistency to achieve, depending on your need for sharp detail. Often humidity interferes, forcing you to add far more powdered sugar to your base recipe than what you think might be reasonable. If you can barely squeeze your piping bag, your consistency is probably overly stiff, but if detail seems to melt, more powdered sugar is needed. Test, then dry the results. Sometimes what doesn’t look quite right when still moist, becomes perfect an hour later.
Test Your Batches
My article, Royal Icing: Test for Royal Icing Consistency by Using Tiny Piping Cones, describes disposable “mini-tools” for use in consistency testing and they are especially helpful to determine correct dot formation.
Ideally, you can test your batches on cookies, scraping the icing off your samples so you can reuse the cookies. Instead of wasting cookies, however, pipe your samples onto small pieces of heavy paper (like parchment) or plastic. I recommend using twelve-by-twelve inch Grafix Craft Plastic Sheets. Cut the large sheets into smaller sections, then use the sections for test surfaces. The sheets are reusable.
If you have specific designs in mind, print (or draw) them, place them under a plastic sheet, then pipe your design onto the plastic sheet. Make sure all your components have the perfect consistency before proceeding. During the preparation phase, cover your mixtures with plastic wrap, then cover their containers with air-tight lids. The mixtures should stay fresh, however, if you see moisture separation when ready to use, revive by stirring.
Note: It is not necessary to remove the backing of plastic sheets, although re-use over time and washing will cause it to fall off.

Drying Your Royal Icing
A well-tested recommendation is that you dry your iced cookies under a fan, dehydrator, or even a small space heater with fan.

Storing Your Cookies
Humidity affects all baked goods. It makes crisp sugar cookies soft and can interfere with the way Royal Icing is cured.
To refrigerate your cookies, decorated or not, place in a box without closing the lid. Cool them to refrigerator temperature, then cover with an air-tight seal.
To freeze your cookies, repeat the instructions above, but do this in the freezer. When the cookies reach your freezer’s temperature, cover with an air-tight seal.
To defrost your cookies, remove the lid and let them warm up in the refrigerator. When defrosted, you can remove them to room temperature.
Note that it is wise to separate layers of your decorated cookies with parchment which will help prevent sticking.
At all times, prevent moisture from forming. For more information, read Royal Icing: Humidity and Royal Icing Storage.
Article Series
For Royal Icing recipes, CLICK HERE.
Questions? Comments? Additions? Corrections? Write to Karen Little at karen@Littleviews.com
Written for Littleviews-Crafts.com by Karen Little, publisher. All rights reserved, but feel free to re-publish this article after contacting Karen so she knows where to find it.
Comparing Royal Icing Recipes, With and Without Corn Syrup (updated 4/25/19)
The basic Royal Icing recipe, which I call “stiff,” is made from pasteurized egg whites and powdered sugar. A variation, which I call “firm,” is made from the same two ingredients, but with slightly more moisture. That moisture can be from water, light corn syrup, or a combination of both.
I do not recommend any recipe that uses meringue powder, even though what I’m sharing here also applies to meringue powder-based recipes. If you do use that product, adding light corn syrup to that mix will improve your outcome, which might otherwise be dull, prone to pitting, sunken, or dry “in waves” or dents.
Initial Appearances
Royal Icing made with pasteurized egg whites results in an almost fool-proof product, but the addition of light corn syrup to it produces icings that dry with shiny surfaces. Depending on the humidity and other factors, however, your initial mixture will be either stiff or firm.
The following photos show a firm mixture that flattens over time to a flat surface.

You can do almost everything with firm-but-not-stiff icing except make 3D structures, like flowers and decorative borders, which must exist without changing shape. To test whether your initial batch is very stiff or just firm, pull a spoon or mixing blade up through the mixture. Stiff peaks do not change shape, while firm peaks do. The speed in which firm peaks flatten depends upon the moisture in the mix.
Observing Consistencies
The measured ingredients of pasteurized egg whites and 10X (highly refined) powdered sugar is not exacting. Depending on the consistencies you need, adjustments are made as you work with Royal Icing by adding (or subtracting) powdered sugar or moisture (water or light corn syrup). Your success depends on your understanding of consistency.
Flood consistency: This mixture will eventually flatten, making a perfect cookie covering, like you see in the photo below. The speed in which it flattens depends on how wet it is. A good flood consistency will not be so wet that it runs off the sides of a cookie or overrides a border (barrier) you made to contain it. To change a firm consistency into a flood consistency, add light corn syrup to the mix and/or very lightly spritz it with water from a food-grade spray bottle.

Note that dots (or “pearls”), like you see in the first image on this page, are made using a consistency that that requires some testing before you commit. With the proper consistency, the tops of the dots settle into a nice rounded shape and their bodies do not spread. If the tops of your dots stand like peaks, the consistency is too dry. If they sink and run, too wet. If you see holes in them, you are probably using meringue powder without light corn syrup.
Firm, piping consistency: This mixture flows out of a piping tip when light pressure is applied to the bag, but does not pour out on its own. If it does, your mixture is too moist. If, however, a piped line appears both thick and thin and its lines ruffle or break as you pipe them, the consistency is too thick for the current task or the piping tip. When you see your icing crawl up the side of your tip, instead of dropping out, your icing is probably a bit too thick for that tip.
A very firm, almost stiff consistency is used for very precise piped lines, the width of which do not spread after being extruded, while the width of piped lines made with a softer, easier to manage consistency will spread slightly.
Stiff consistency: Usually, the initial batch is very stiff, however, many things can cause the initial batch to only be very firm. Firm icing can be used as a “starter” for most of your tasks, but if you do need a true stiff consistency, add more powdered sugar to the batch, a little at a time. Test until you see the batch meets your needs.
Piping tip consistency: Size matters. The smaller the tip, the more you must observe your adjustments. A firm consistency that flows beautifully through a #5 tip might flow too slowly through a smaller #2 and a firm consistency that flows through a #2 might be too stiff for a tiny #1.
Humidity: The best environment in which to make and use Royal Icing is one that is air conditioned. If your indoor humidity is high, it can make your sugar cookies soggy and create conditions where your Royal Icing won’t dry properly. Just because successful Royal Icing makes a hard, smooth surface, it is not stone and it will absorb atmospheric moisture. Keep your finished work packed in a refrigerated, air-tight container until ready to eat or sell. Keep it in a cooler until ready to eat at a picnic on a very hot, humid day by a lake.
Article Series
For Royal Icing recipes, CLICK HERE
For a list of all articles in this series in the order written, CLICK HERE
Questions? Comments? Additions? Corrections? Write to Karen Little at karen@Littleviews.com
Written for Littleviews-Crafts.com by Karen Little, publisher. All rights reserved, but feel free to re-publish this article after contacting Karen so she knows where to find it.
Royal Icing: How to Keep Sugar Flakes Off Your Work Area (update 1/20/19)
To avoid spoiling our creations from unwanted sugar flakes, we have to keep our Royal Icing decorating area very clean.
Unfortunately, sugar flakes caused by frosting drying on our fingers, piping bags, and other utensils often drop onto our work.
Even wiping up with paper towels can be problematic. Icing quickly dries on these towels, generating even more flakes on our work surface every time we pick one up.
You can, however, defeat sprinkling sugar flakes on your pretty cookies by using the following six inexpensive items:
- Use disposable piping bags in sets of 2
- Ateco 399 piping tip covers
- Pastry tips with couplers
- Snack bag clips
- Cookie turntable
- and many damp microfiber washcloths . . .
Products to Help Keep Your Royal Icing Work Area Clean
You can buy disposable piping bags online from Amazon, Walmart, bakery supply houses, and vendor sites, as well as from local hobby stores (most of which have online presence).
Use disposable piping bags in sets of two. Fill the first one with Royal Icing and use the second bag to cover the first, thereby trapping any icing schemers inside. To make the two bags easier to handle, I recommend that you trim the cover bag two inches shorter than the frosting bag.

Ateco makes piping tip covers that slide over the actual piping tip and the coupler holding the tip to the pastry bag. When joined to the coupler, the cover prevents frosting from leaking out of the tip.
To solve the problem of Royal Icing drying at the tip, stuff a small amount of damp paper towel into the cover so that the tip abuts the towel. Adjust this as needed.
Note that Ateco products relate to one another. If you have non-Ateco couplers, they might fit these covers, but check first. For more selections, do a Google Search on “piping tip covers,” always making sure that the covers you select match the couplers you have.

I recommend using flat snack clips to bind the tops of pastry bags. They are easy to see, use, and wash. If you can’t find them in your local grocery store, check online under the phrase “snack bag clips.” I purchase mine from IKEA.

To avoid getting Royal Icing on your fingers (a sure source of sugar flakes), use a small, round turntable to turn your cookies, instead of turning them with your fingers. This a 3-inch diameter Lazy Susan Turntable by VXB Bearings is the perfect size for most cookies and your budget at around $7. (There is also a clear acrylic version, but it is not commonly in stock.)
If your cookies are small, set them directly on the turntable’s surface. For larger cookies, make a larger surface by cutting a circle from a stiff acrylic sheet, such as sold by Grafix Craft Plastic Sheets, and attaching it to the turntable with Scotch Restickable Tabs. Check your local office supply store for similar products.
Notice – the design of this turntable has changed slightly and as of January 23, 2019, I have not yet tested it. It seems to have smoother rotating properties.

Keep in mind that you clean the turntable by wiping, not dunking in dish water. If you want an extra layer of sanitation, cut a circle from parchment paper and affix it to the top with double sided tape.
Now then, to wipe away frosting as you work, I recommend keeping one or two damp microfiber “smooth” wash cloths at your side, preferably the face cloth size. These cloths are commonly available, however, if a shopping center isn’t nearby, Amazon and Walmart always have a good selection.
Using the Recommended Products
By using two disposable piping bags together, the outer one, which holds the coupler and piping tip, always stays clean and free of frosting flakes. You can even exchange the inner one without having to redo the outer one, something I find handy if I have to change a consistency.
For ease of handling, cut the top of the outer bag about 1.5 to 2-inches shorter than the inner bag which holds the icing.

The photo above shows an outer bag complete with coupler and tip.
The photo below shows a filled inner bag before the tip was cut.

To assemble, snip the tip of the filled bag, then quickly slip it into the coupler as seen in the next picture. The arrow points to the assembly area that, in this case, also includes a piping tip cover.
Note: The cut tip should be a reasonable size, which is smaller than the coupler opening, but not so small that squeezing frosting out of the hole is difficult.

Once assembled, squeeze the top of the bags so frosting doesn’t escape and seal with a snack bag clip.

Note that whether using two or one bags, dried icing can fall from an open bag top.

When your icing bag looks like the picture above, make sure you seal its top completely. Without a seal, if you accidentally brush against the bag, your work area will be showered with frosting flakes. Under this condition, I seal a messy top with a snack bag clip in addition to the clip I attach to the pressure point.
Use a Lazy Susan to protect the sides of your freshly frosted cookie from being touched by your fingers and keep your fingers free of frosting. This Lazy Susan rotates with a slight hesitation. To relieve that, slip a drop or two of light oil between the bearing’s housings.
Notice – the design of this turntable has changed slightly and as of January 23, 2019, I have not yet tested it. It seems to have smoother rotating properties.

During all phases of your project, regularly wipe surfaces clean with a damp cloth. I prefer using damp microfiber washcloths, and always have two or more by my side. A paper towel is handy, but frosting drys on it, so when you lift it up, sugar flakes often fall off.
To protect the frosting in your piping tip from drying out when being used, use a tip cover or rest it on one half of a damp washcloth, then flip the other half over the tip.
Links
- Buy disposable piping bags at any number of online resources, such as Amazon, Walmart, and bakery supply houses
- Buy Ateco piping tips at Amazon or any number of online shops. To find different brands, do a Google Search on “piping tip covers“
- Grafix Craft Plastic Sheets and Scotch Restickable Tabs can be purchased at Amazon, as well as art and office supply stores
- Check online for “snack bag clips.” I purchase mine from IKEA.
- VXB Bearings is the manufacturer of the 3-inch diameter Lazy Susan Turntable Bearing. This specific bearing is not commonly sold as a cookie decorating aid.
- Buy microfiber washcloths from Amazon or Walmart. I prefer the smooth, facecloth sizes.
Article Series
For Royal Icing recipes, CLICK HERE.
For a list of all articles in this series in the order written, CLICK HERE
Questions? Comments? Additions? Corrections? Write to Karen Little at karen@Littleviews.com
Written for Littleviews-Crafts.com by Karen Little, publisher. All rights reserved, but feel free to re-publish this article after contacting Karen so she knows where to find it.