Category: Royal Icing and Sugar Cookie Decoration
Royal Icing: Preparing Icing Nails to Make Flowers
While you can easily pipe lines and designs with Royal Icing, making Royal Icing flowers that you can use for transfers requires precision.
If you are both skilled and steady enough, it is possible to pipe flowers directly on your cookies, but if you make a mistake, you need to throw away (or “eat”) the cookie. By making transfers, which means that you make your design, let it harden, then “glue” it onto an iced cookie via a spot of Royal Icing, you save yourself from making mistakes.
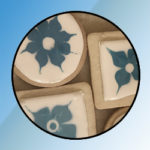
As an example, the picture below shows four previously iced cookies and on top of them, I placed previously dried Royal Icing flowers.

As of March 2019, I was new to making Royal Icing flowers so proceeded with nothing but online blogs and tutorials to guide me. Many recommended that I use frosting nails, like sold in a 6-pack on Amazon, topped with a grid to help control sizes.
At one time, Wilton, the famous baking implement supply company, sold tacky-backed frosting nail grids to paste on their nails, but that product is no longer available. Many copies, however, exist in blogs and on Pinterest, with a very complete article on the subject by The Barefoot Baker.
Many of the original grids are for very specific flowers. In using copies, however, I found that some of the information was confusing, so I made a universal grid that can be used for everything. Pick up a full page copy of it by CLICKING HERE.

To use the grid, print out the PDF file (it fits on an 8.5×11 sheet of paper). It contains nine grids like the one seen above.
Roughly cut each grid out of the printout, and place the cutouts somewhat close together on the sticky side of a self-seal, laminating sheet. Cut the entire group of grids out of the laminating sheet and place them onto the sticky side of another laminating sheet so that they are sealed between the two sheets.

Once sealed, cut out each grid so they appear like in the following picture.

Now glue each grid to a frosting nail. You can use a stick glue or double-sided tape. You will want the grid to hold firmly while in use, but easy to remove as needed. A glue stick works well, and in the case of a tinted stick glue, the color disappears when dried.

The final nail looks like this:

To use the grid-covered nail, dot the grid with a small amount of Royal Icing, then stick a square piece of parchment (or “waxed”) paper on it.

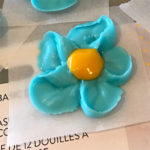
Pipe your Royal Icing flower onto the paper, using the grid as a guide. Slip the paper off the nail and set it and your newly created flower aside to dry.

Make several grids at the same time, more than you need for a day’s work. While they can be carefully wiped off after use and saved, if you try washing them, water seeps into the edges.
Links
- Tutorial on How to Use Piping Nails by The Barefoot Baker. Note that Lisa, the writer/publisher of this site as of April 2019 just survived a serious brain tumor operation. Check her site to find out more and wish her the best!
- How to Make Royal Icing Apple Blossom Flowers by Cookies Cupcakes and Cardio
- How to Use a Flower Nail to Pipe Royal Icing Flowers by Wilton
- How to Make Royal Icing Apple Blossom Flowers by Emma’s Sweets on Julia Usher’s Cookie Connection
- Cake Decorating Piping Techniques: How to Make Drop Flowers
- Piped Five Petal Blossom Basics Video Demonstration
Questions? Comments? Additions? Corrections? Write to Karen Little at Karen@Littleviews.com
Written for Littleviews-Crafts.com by Karen Little, publisher, on May 4, 2019. All rights reserved, but feel free to re-publish this article after contacting Karen so she knows where to find it.
Royal Icing: Making 3 Inch Tile Sugar Cookies
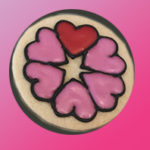
Symmetrical designs are part of everyone’s heritage and have mesmerized me all my life. Symmetrical designing, in fact, is the reason I became interested in Royal Icing because it can produce a glossy surface on sugar cookies, which, in a delicious way, resembles tiles.
If you are unfamiliar with the wide range of symmetrical designs, review posts on Pinterest. There you’ll see many designs, like in the montage below, that can be adapted to cookies via Royal Icing. For examples, click the following links:
Russian Mandala Arts — Mexican Tiles — Polish Paper Cutting Arts — Danish Rosemaling — Doilies

Artists who specialize in symmetrical designing begin their work on a grid, many of which are available on Pinterest, Etsy, and through Google searches. Based on prototypes, I created the grids below to use for sketching designs that fit within a 3-inch area. Feel free to copy and expand them for your own needs.

I print out several sheets of these grids and doodle designs on them whenever I have the time. For inspiration, I draw to themes, such as flowers, leaves, suns, birds, fish, Hindu symbols, etc.

While the designs I doodle can be very complex, if I see a pleasing shape, I simplify it, then scan it into Photoshop for further refining. You can also simplify designs by covering them with tracing paper, and redrawing over them. When satisfied with your work, transfer your designs to heavy paper (card stock) and cut them out.


Eventually, I plan on creating silk screens to transfer the outlines to cookies, but for now, I trace the cutouts onto the cookies by hand, using food-grade pens. I then pipe a Royal Icing outline over the tracing, let the outline dry overnight, and fill it in with flowing Royal Icing the next day.
I call these creations “Tile Cookies” and plan on developing designs for 4-and 5-inch square sugar cookies in the future. I love using black Royal Icing for the piping, but if you do, make sure it is absolutely dry before filling the outline with another color as the black can bleed.
Should you try this, mix light corn syrup into your flow-consistency icing to achieve gloss. Adding the light corn syrup should maintain the flow consistency you need, not make it wetter. Add small amounts of powder sugar back to your mix if it does get too wet.


As I work with larger cookies, the designs will become more complex. Some of the designs seen here, for example, might become the centers of larger structures.
Under all circumstances, tile cookies make joyful gifts and because they are relatively flat, are easy to package. I have a dozen in each of these clear, 4-inch square, food-grade boxes below and could probably could have fit a dozen more.

An ultra-wide selection of food-grade, clear plastic packaging can be purchased from ClearBags.com. Note that I packaged the “display” cookies in small clear envelopes and grouped the remaining cookies in plastic-wrap, then surrounded the grouping with gift-box filler.
Links
- Many of the traditional designs in the Russian art of Khokholoma are still used today.
- Examples of Khokholoma on Instagram and on Google Images
- Videos on how to create mandalas on YouTube
- Polish paper cutting images can be adapted to Royal Icing
- Many folk art symbols can be adapted to Royal Icing
- Articles about meditation surrounding the development of mandalas
- Littleviews’ recommended Royal Icing recipe
- Royal Icing consistencies by Julia Usher
- Toolbox Talk: Corn Syrup in Royal Icing by Liesbet Schietecatte on Julia Usher’s Cookie Connection.
- Packaging was purchased from ClearBags.com
Questions? Comments? Additions? Corrections? Write to Karen Little at Karen@Littleviews.com
Written for Littleviews-Crafts.com by Karen Little, publisher, and updated on April 27, 2019. All rights reserved, but feel free to re-publish this article after contacting Karen so she knows where to find it.
Comparing Royal Icing Recipes, With and Without Corn Syrup (updated 4/25/19)
The basic Royal Icing recipe, which I call “stiff,” is made from pasteurized egg whites and powdered sugar. A variation, which I call “firm,” is made from the same two ingredients, but with slightly more moisture. That moisture can be from water, light corn syrup, or a combination of both.
I do not recommend any recipe that uses meringue powder, even though what I’m sharing here also applies to meringue powder-based recipes. If you do use that product, adding light corn syrup to that mix will improve your outcome, which might otherwise be dull, prone to pitting, sunken, or dry “in waves” or dents.
Initial Appearances
Royal Icing made with pasteurized egg whites results in an almost fool-proof product, but the addition of light corn syrup to it produces icings that dry with shiny surfaces. Depending on the humidity and other factors, however, your initial mixture will be either stiff or firm.
The following photos show a firm mixture that flattens over time to a flat surface.

You can do almost everything with firm-but-not-stiff icing except make 3D structures, like flowers and decorative borders, which must exist without changing shape. To test whether your initial batch is very stiff or just firm, pull a spoon or mixing blade up through the mixture. Stiff peaks do not change shape, while firm peaks do. The speed in which firm peaks flatten depends upon the moisture in the mix.

Observing Consistencies
The measured ingredients of pasteurized egg whites and 10X (highly refined) powdered sugar is not exacting. Depending on the consistencies you need, adjustments are made as you work with Royal Icing by adding (or subtracting) powdered sugar or moisture (water or light corn syrup). Your success depends on your understanding of consistency.
Flood consistency: This mixture will eventually flatten, making a perfect cookie covering, like you see in the photo below. The speed in which it flattens depends on how wet it is. A good flood consistency will not be so wet that it runs off the sides of a cookie or overrides a border (barrier) you made to contain it. To change a firm consistency into a flood consistency, add light corn syrup to the mix and/or very lightly spritz it with water from a food-grade spray bottle.

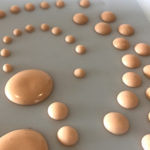
Note that dots (or “pearls”), like you see in the first image on this page, are made using a consistency that that requires some testing before you commit. With the proper consistency, the tops of the dots settle into a nice rounded shape and their bodies do not spread. If the tops of your dots stand like peaks, the consistency is too dry. If they sink and run, too wet. If you see holes in them, you are probably using meringue powder without light corn syrup.
Firm, piping consistency: This mixture flows out of a piping tip when light pressure is applied to the bag, but does not pour out on its own. If it does, your mixture is too moist. If, however, a piped line appears both thick and thin and its lines ruffle or break as you pipe them, the consistency is too thick for the current task or the piping tip. When you see your icing crawl up the side of your tip, instead of dropping out, your icing is probably a bit too thick for that tip.
A very firm, almost stiff consistency is used for very precise piped lines, the width of which do not spread after being extruded, while the width of piped lines made with a softer, easier to manage consistency will spread slightly.
Stiff consistency: Usually, the initial batch is very stiff, however, many things can cause the initial batch to only be very firm. Firm icing can be used as a “starter” for most of your tasks, but if you do need a true stiff consistency, add more powdered sugar to the batch, a little at a time. Test until you see the batch meets your needs.
Piping tip consistency: Size matters. The smaller the tip, the more you must observe your adjustments. A firm consistency that flows beautifully through a #5 tip might flow too slowly through a smaller #2 and a firm consistency that flows through a #2 might be too stiff for a tiny #1.
Humidity: The best environment in which to make and use Royal Icing is one that is air conditioned. If your indoor humidity is high, it can make your sugar cookies soggy and create conditions where your Royal Icing won’t dry properly. Just because successful Royal Icing makes a hard, smooth surface, it is not stone and it will absorb atmospheric moisture. Keep your finished work packed in a refrigerated, air-tight container until ready to eat or sell. Keep it in a cooler until ready to eat at a picnic on a very hot, humid day by a lake.
Article Series
For Royal Icing recipes, CLICK HERE
For a list of all articles in this series in the order written, CLICK HERE
Questions? Comments? Additions? Corrections? Write to Karen Little at karen@Littleviews.com
Written for Littleviews-Crafts.com by Karen Little, publisher. All rights reserved, but feel free to re-publish this article after contacting Karen so she knows where to find it.
Royal Icing: How to Keep Sugar Flakes Off Your Work Area (update 1/20/19)
To avoid spoiling our creations from unwanted sugar flakes, we have to keep our Royal Icing decorating area very clean.
Unfortunately, sugar flakes caused by frosting drying on our fingers, piping bags, and other utensils often drop onto our work.
Even wiping up with paper towels can be problematic. Icing quickly dries on these towels, generating even more flakes on our work surface every time we pick one up.
You can, however, defeat sprinkling sugar flakes on your pretty cookies by using the following six inexpensive items:
- Use disposable piping bags in sets of 2
- Ateco 399 piping tip covers
- Pastry tips with couplers
- Snack bag clips
- Cookie turntable
- and many damp microfiber washcloths . . .
Products to Help Keep Your Royal Icing Work Area Clean
You can buy disposable piping bags online from Amazon, Walmart, bakery supply houses, and vendor sites, as well as from local hobby stores (most of which have online presence).
Use disposable piping bags in sets of two. Fill the first one with Royal Icing and use the second bag to cover the first, thereby trapping any icing schemers inside. To make the two bags easier to handle, I recommend that you trim the cover bag two inches shorter than the frosting bag.

Ateco makes piping tip covers that slide over the actual piping tip and the coupler holding the tip to the pastry bag. When joined to the coupler, the cover prevents frosting from leaking out of the tip.
To solve the problem of Royal Icing drying at the tip, stuff a small amount of damp paper towel into the cover so that the tip abuts the towel. Adjust this as needed.
Note that Ateco products relate to one another. If you have non-Ateco couplers, they might fit these covers, but check first. For more selections, do a Google Search on “piping tip covers,” always making sure that the covers you select match the couplers you have.

I recommend using flat snack clips to bind the tops of pastry bags. They are easy to see, use, and wash. If you can’t find them in your local grocery store, check online under the phrase “snack bag clips.” I purchase mine from IKEA.

To avoid getting Royal Icing on your fingers (a sure source of sugar flakes), use a small, round turntable to turn your cookies, instead of turning them with your fingers. This a 3-inch diameter Lazy Susan Turntable by VXB Bearings is the perfect size for most cookies and your budget at around $7. (There is also a clear acrylic version, but it is not commonly in stock.)
If your cookies are small, set them directly on the turntable’s surface. For larger cookies, make a larger surface by cutting a circle from a stiff acrylic sheet, such as sold by Grafix Craft Plastic Sheets, and attaching it to the turntable with Scotch Restickable Tabs. Check your local office supply store for similar products.
Notice – the design of this turntable has changed slightly and as of January 23, 2019, I have not yet tested it. It seems to have smoother rotating properties.

Keep in mind that you clean the turntable by wiping, not dunking in dish water. If you want an extra layer of sanitation, cut a circle from parchment paper and affix it to the top with double sided tape.
Now then, to wipe away frosting as you work, I recommend keeping one or two damp microfiber “smooth” wash cloths at your side, preferably the face cloth size. These cloths are commonly available, however, if a shopping center isn’t nearby, Amazon and Walmart always have a good selection.
Using the Recommended Products
By using two disposable piping bags together, the outer one, which holds the coupler and piping tip, always stays clean and free of frosting flakes. You can even exchange the inner one without having to redo the outer one, something I find handy if I have to change a consistency.
For ease of handling, cut the top of the outer bag about 1.5 to 2-inches shorter than the inner bag which holds the icing.

The photo above shows an outer bag complete with coupler and tip.
The photo below shows a filled inner bag before the tip was cut.

To assemble, snip the tip of the filled bag, then quickly slip it into the coupler as seen in the next picture. The arrow points to the assembly area that, in this case, also includes a piping tip cover.
Note: The cut tip should be a reasonable size, which is smaller than the coupler opening, but not so small that squeezing frosting out of the hole is difficult.

Once assembled, squeeze the top of the bags so frosting doesn’t escape and seal with a snack bag clip.

Note that whether using two or one bags, dried icing can fall from an open bag top.

When your icing bag looks like the picture above, make sure you seal its top completely. Without a seal, if you accidentally brush against the bag, your work area will be showered with frosting flakes. Under this condition, I seal a messy top with a snack bag clip in addition to the clip I attach to the pressure point.
Use a Lazy Susan to protect the sides of your freshly frosted cookie from being touched by your fingers and keep your fingers free of frosting. This Lazy Susan rotates with a slight hesitation. To relieve that, slip a drop or two of light oil between the bearing’s housings.
Notice – the design of this turntable has changed slightly and as of January 23, 2019, I have not yet tested it. It seems to have smoother rotating properties.

During all phases of your project, regularly wipe surfaces clean with a damp cloth. I prefer using damp microfiber washcloths, and always have two or more by my side. A paper towel is handy, but frosting drys on it, so when you lift it up, sugar flakes often fall off.
To protect the frosting in your piping tip from drying out when being used, use a tip cover or rest it on one half of a damp washcloth, then flip the other half over the tip.
Links
- Buy disposable piping bags at any number of online resources, such as Amazon, Walmart, and bakery supply houses
- Buy Ateco piping tips at Amazon or any number of online shops. To find different brands, do a Google Search on “piping tip covers“
- Grafix Craft Plastic Sheets and Scotch Restickable Tabs can be purchased at Amazon, as well as art and office supply stores
- Check online for “snack bag clips.” I purchase mine from IKEA.
- VXB Bearings is the manufacturer of the 3-inch diameter Lazy Susan Turntable Bearing. This specific bearing is not commonly sold as a cookie decorating aid.
- Buy microfiber washcloths from Amazon or Walmart. I prefer the smooth, facecloth sizes.
Article Series
For Royal Icing recipes, CLICK HERE.
For a list of all articles in this series in the order written, CLICK HERE
Questions? Comments? Additions? Corrections? Write to Karen Little at karen@Littleviews.com
Written for Littleviews-Crafts.com by Karen Little, publisher. All rights reserved, but feel free to re-publish this article after contacting Karen so she knows where to find it.